
When making a proforma invoice, start by picking a proforma invoice template that fits your needs, like one from Excel, Word, or invoicing software. Then, add important info like the invoice number, date, client details, and when payment is expected. List all the items or services with descriptions, amounts, prices, and the total to be paid. Also, include how you want to be paid and any taxes or discounts.
Make it look good with your company’s style and logo, and think about adding extra info like payment terms or notes. Once it’s done, send it to the client so they can easily see and pay for it. Following these steps helps make sure your proforma invoice is clear and correct and helps get paid on time.
Creating a proforma invoice might sound intimidating, but it’s quite straightforward. This guide will walk you through everything you need to know about proforma invoices, from what they are to how to create them yourself while addressing common invoicing challenges for businesses.
We’ll break down the process into easy-to-follow steps, exploring various methods like using Excel, Word, or dedicated invoicing software. By the end, you’ll be a pro at creating proforma invoices quickly!
What is a Proforma Invoice?
A proforma invoice is a preliminary bill that acts like a detailed quote for a potential sale. It gives the buyer a clear idea of the cost breakdown, including things like product details, price, and estimated delivery. Unlike a regular invoice, it’s not final and is used to ensure both parties are on the same page before finalizing the deal. This helps avoid surprises later and can be useful for securing pre-payment or when extra clarity is needed, especially in trade for payments with international clients.
Here are the key elements to consider when crafting a Proforma Invoice:
- Identification: Clearly labeled as “Proforma Invoice” to avoid confusion with a final invoice.
- Seller Information: Your business name, address, and contact details.
- Buyer Information: Buyer’s company name, address, and contact details (including any reference number they use).
- Invoice Details: A unique invoice number and the date of issue.
- Product/Service Description: A clear description of the goods or services being offered, including quantity.
- Pricing: Unit price for each item and the total cost.
- Additional Charges: Any applicable taxes, discounts, shipping, and handling fees.
- Payment Terms: Preferred payment methods, due date, and procedures for overdue payment.
- Validity Period: How long the prices quoted are valid (optional, but useful for fluctuating costs).
- Terms & Conditions: A link or reference to your company’s terms and conditions.
Ways To Create A Proforma Invoice
There are several methods for generating proforma invoices, but some stand out for their ease of use: Microsoft Excel, Microsoft Word, and dedicated invoicing software. Let’s delve into the key differences between these three approaches:
| Tool | Good For | Description |
| Excel | One-off invoices or complex calculations | A powerful spreadsheet for building invoices from scratch, but it can be time-consuming. |
| Word | Simple invoices where looks matter | A user-friendly document builder with pre-designed templates for a professional touch. |
| Invoicing Software | Regular invoicing or complex needs | A dedicated tool that automates everything, saving time and effort, but it might have a cost. may come with a cost. |
Simple Choice:
- Occasional invoices? Excel or Word might work.
- Regular invoicing? Invoicing software is your friend.
Now that you understand the difference between each method, let’s dive into step-by-step guides for creating a proforma invoice in Excel, Word, and invoicing software. Consider all three methods. Then, choose the one that best fits your needs.
1. How To Create a Proforma Invoice In Excel?
There are two primary methods for generating a proforma invoice in Excel:
Method 1: Utilizing pre-designed templates.
Method 2: Building it from the Scratch
We’ll cover both methods of creating proforma invoices in Excel, allowing you to select the one that best fits your requirements.
Method 1: Using Pre-Designed Templates
- Build-in Templates: You can access built-in proforma invoice template by Excel to streamline the process of creating professional Proforma Invoices.
To create your proforma invoice creation with Excel’s built-in templates follow these steps;
- Open Excel
- Look for the “More templates” option. It might be a button or a tab depending on your Excel version.
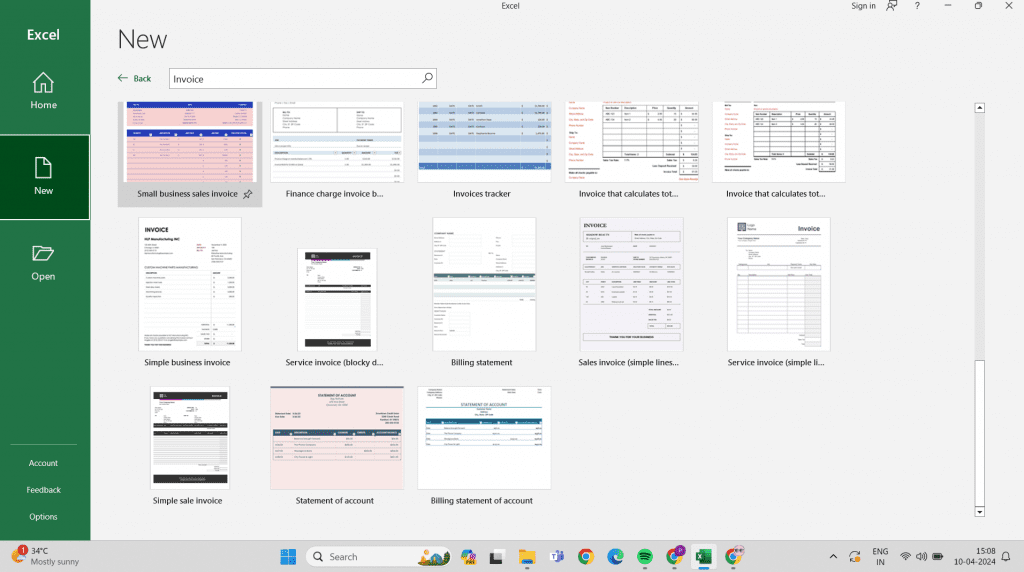
- In the search bar, type “Invoice”.
- Excel will present you with a variety of pre-designed invoice templates to choose from.
Now you can pick a template that suits your style and start customizing it with your business information and details of the proposed sale.
Take a look at this image showcasing the pre-made templates available in Excel for creating a proforma invoice.
Downloadable Templates: Many online platforms, such as Refrens, provide a wide array of free downloadable Proforma invoice templates specifically designed for Excel, featuring diverse designs to suit different preferences.
Benefits of using Proforma invoice templates:
– Time-saving: Templates provide a structured format, saving time by eliminating the need to create invoices from scratch. You simply fill in the relevant information.
– Professionalism: Well-designed templates enhance the professional image of your business, impressing clients with clear, organized, and visually appealing invoices.
– Customization: Enable you to add your company logo, adjust colors, and tailor the layout to match your brand identity.
– Efficiency: Using templates streamlines the invoicing process, enabling you to generate invoices quickly and efficiently, freeing up time for other business tasks.
Overall, utilizing proforma invoice templates can significantly improve the efficiency, accuracy, and professionalism of your invoicing process.
Method 2: Building it from the Scratch
Creating a professional-looking proforma invoice in an Excel sheet is straightforward, even for beginners. Let’s thoroughly review each step to ensure you can easily create one.
Step 1: Open Excel and Prepare Your Spreadsheet
- Launch Excel: Start by opening Microsoft Excel. If you’re greeted with a welcome screen, select “Blank Workbook” to start a new project.
- Save Your File: It’ a positive practice to save your file right away. Click “File” > “Save As,” choose your location, and give your document a name like “Proforma Invoice along with invoice number, like PI001.”
Step 2: Setting Up Your Invoice Structure
- Title Your Document: In the first row of your Excel sheet, merge the first few cells across the top to create space for your title. You can do this by selecting the cells, right-clicking, and choosing “Merge & Center.” Type “Proforma Invoice” as your title.
- Format the Title: Make the title stand out by increasing the font size, changing the font type, and perhaps applying bold formatting.
Step 3: Seller and Buyer Information
- Seller Information: In the rows below your title, inputstart inputting your company’s details. Label each row with tags like “Seller Name,” “Address,” “Phone Number,” “Email,” etc., filling out the corresponding information next to these labels.
- Buyer Information: Leave a space or draw a line (you can insert a border for separation) and repeat the process for the buyer’s information on the opposite side of the sheet or directly below the seller’s information.
Step 4: Invoice Details
Create Fields for Invoice Details: Below the seller and buyer information, dedicate a few rows to include:
- Invoice Number: A unique identifier for this proforma invoice.
- Date of Issue: The date you are issuing the invoice.
- Delivery Date: Expected delivery date of goods or services, if known.
Step 5: Listing Products or Services
- Create a Table: You’ll list the items you’re invoicing. Start by creating column headers in a new row for “Item Number/Code,” “Description,” “Quantity,” “Unit Price,” and “Total Price.”
- Fill in Your Data: Under each header, list out the products or services you’re offering, the quantities, and their prices. Use separate rows for different items.
- Use Formulas for Calculations: In the “Total Price” column, you’ll calculate the cost of each item line. If you’re not familiar with Excel formulas, simply click a cell in the Total Price column, type `=`, click the cell under Quantity, type `*` (multiply), and then click the cell under Unit Price. Press Enter. Drag the bottom right corner of the cell down to apply this formula to other items.
Step 6: Terms and Additional Details
- Terms of Sale: After listing all items, provide a section that outlines the terms of sale, including payment terms For example, in the invoice shown above, the seller has defined two terms i.e
1. Only faulty goods can be exchanged in 10 days after sales
2. please mention the invoice number in your payment receipt
Step 6: Notes or Special Instructions: If there are any additional details relevant to the invoice or sale, include them at the bottom.
Step 7: Calculating Totals
- Subtotal: Use Excel’s SUM function to calculate the subtotal of all items listed. For example, if your Total Price column is column g, and your items are from rows 18 to 23, you would use `=SUM(E18:E23)`as shown in the above image.
- Taxes and Shipping: If applicable, calculate taxes and shipping costs and add these to the subtotal.
Grand Total: Finally, sum all the costs to provide a total.
Step 8: Final Touches and Saving
- Review Your Invoice: Check for any errors or missing information.
- Formatting: Make your invoice visually appealing by applying cell borders, adjusting column widths, and using text formatting (bold, italics) for emphasis.
- Save and Export: Save your Excel file. Also, export the invoice to PDF format for sending to your customer. This can be done by going to “File” > “Export” > “Create PDF/XPS.”
Tips for creating a professional proforma invoice in Excel:
– Clear and Organized Layout: Use a clean, organized layout with clear sections for easy readability.
– Detailed Descriptions and Itemized Costs: Provide detailed descriptions of products/services and itemize costs to ensure transparency.
– Accurate Calculations and Payment Terms: Double-check all calculations for accuracy and state payment terms to avoid any misunderstandings.
2. How To Create a Proforma Invoice In Word?
Similar to Excel, you can also generate a proforma invoice in Microsoft Word using two methods:
- Using Built-in Templates: This is the quickest and easiest method, ideal for beginners.
- Creating from Scratch: This method offers more flexibility in design and customization but requires a bit more effort.
We’ll walk through both approaches step by step, enabling newcomers to easily craft professional proforma invoices using either method.
Method 1: Using Built-in Templates
- Build-In Templates
You can access ready-made proforma invoice template by Word, simplifying the task of generating professional proforma invoices.
To create your proforma invoice creation with Word built-in templates follow these steps;
- Open Word
- Look for the “More templates” option. It might be a button or a tab depending on your version.
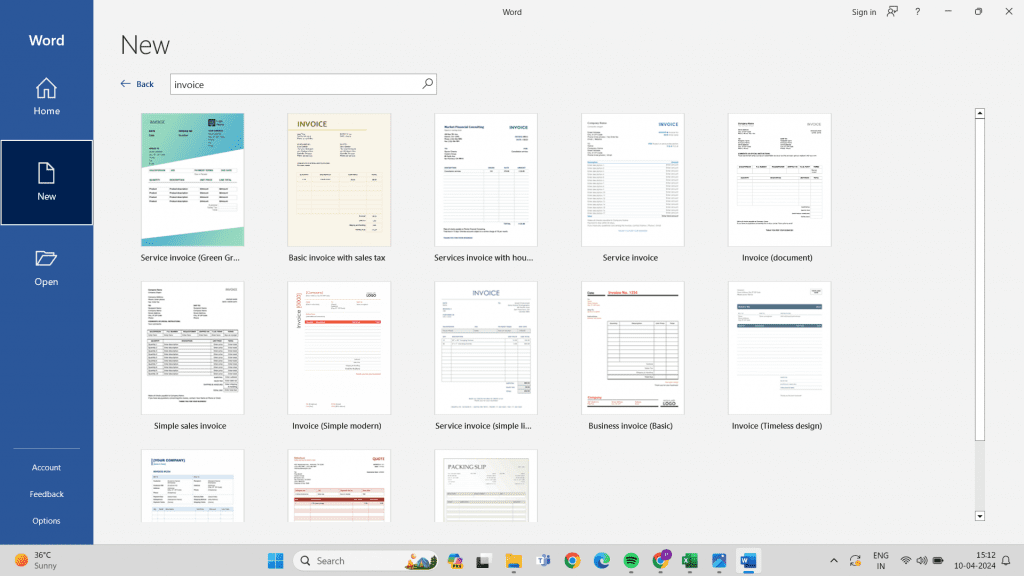
- In the search bar, type “Invoice”.
- Word will present you with a variety of pre-designed invoice templates to choose from.
Now you can pick a template that suits your style and start customizing it with your business information and details of the proposed sale.
Take a look at this image below showcasing the pre-made templates available in Words for creating a proforma invoice.
Method 2: Creating from Scratch
Crafting a polished proforma invoice within Word is a straightforward process, accessible even to novices. Let’s meticulously examine each step to guarantee a smooth creation process.
1. Open Microsoft Word.|
2. Create a New Document: Click on “New Blank Document” to start with a clean slate.
3. Insert Header and Footer: Go to the “Insert” tab and click on “Header” or “Footer” to create sections for your company information and invoice details.
4. Add Your Company Information: In the header section, include your company name, logo (optional), address, phone number, and email address.
5. Add Recipient Information: Below the header, create a section for the recipient’s company name, contact person, address, and email address. Label this section “Bill To” or “Customer Information.”
6. Create an Invoice Table: Use a table to organize your product or service details. Include columns for Item # (optional), Description, Quantity, Unit Price, Amount (formula: Quantity x Unit Price), Discount (optional), and Total (formula: Amount – Discount).
7. Add Invoice Details: Outside the table, include the invoice number, invoice date, and due date.
8. Add Payment Terms: Below the total amount, specify your payment terms, such as net 30 days (payment is due within 30 days from the invoice date).
9. Add Notes: In the footer section, include any additional information, such as your bank details for payment or a thank you message to the customer.
10. Format and Customize: Use the formatting options in Word to adjust fonts, colors, borders, and layout to create a professional-looking invoice.
11. Save Your Invoice: Choose a descriptive filename for your invoice and save it as a .docx file (Word Document) or a .pdf file.
Tips for Creating Professional Proforma Invoices:
– Use a professional font and consistent formatting throughout the invoice.
– Proofread the invoice carefully before sending it to the customer.
– Mark the invoice as “Proforma Invoice” to avoid confusion.
– Consider including your company logo for a more professional touch.
By following these steps, you can easily create a professional-looking proforma invoice in Word using either the built-in templates or by creating one from scratch. Choose the method that best suits your needs and skill level.
Crafting proforma invoices doesn’t have to be a time-consuming task. Pre-designed templates offer a quick and professional way to create them. Let’s explore two popular methods for crafting proforma invoices using templates:
1. Find Templates:
Built-in Templates (Microsoft Excel & Google Sheets):
Both Excel and Google Sheets offer a variety of built-in proforma invoice templates. Here’s how to access them:
- Excel: Open Excel and use the search bar to find “proforma invoice” templates. Choose the one that suits your needs.
- Google Sheets: Navigate to the “Template Gallery” under the “File” menu in Google Sheets. Search for “proforma invoice” and select your preferred template.
Downloadable Templates (Websites like Refrens):
Various websites, such as Refrens, offer a range of downloadable proforma invoice templates. Here’s how to use them:
- Visit the website offering proforma invoice templates, such as Refrens.
- Browse the available designs and download the template that matches your preferences.
2. Fill in the Information:
Once you’ve selected a template and opened it in your editing software, it’s time to input the necessary information. Key details to include are:
- Your Business Information: Name, logo, contact details.
- Client Information: Name, contact details.
- Invoice Details: Reference number, issuance date, anticipated payment date.
- Line Items: Description, quantity, unit price, total amount for each service or product.
- Payment Terms: Accepted payment methods, terms, relevant taxes or discounts.
3. Customize:
Most templates allow for customization to align with your brand. You can adjust fonts, colors, and incorporate your logo.
4. Save and Share:
Once you’ve filled out the information and customized the design if desired, save your proforma invoice as a PDF for easy sharing. You can then send it to your client via email or another preferred method.
Addiṭional Tips:
- Maintain consistency by using the same template for all your proforma invoices.
- Ensure clarity and accuracy by using clear and concise language.
- Double-check all details before sending the proforma invoice to the client.
Benefits of Using Proforma Invoice Templates:
– Time-saving: Templates eliminate the need to create an invoice from scratch, saving you time.
– Professional Appearance: Pre-designed templates ensure a polished and professional look for your proforma invoices
– Consistency: Using templates helps maintain consistency in the format of your proforma invoices, making them easier for clients to understand.
– Accuracy: Built-in formulas in spreadsheet templates can minimize errors in calculations.
– Customization: Most templates allow for customization to ./incorporate your branding elements and specific information.
By utilizing proforma invoice templates, you can streamline invoicing process, and ensure clients receive clear and accurate billing information.
3. How To Create Proforma Invoice Using Software?
As we’ve already said previously, software is are a powerful time-saving tool for frequent invoicers. But with a variety of proforma invoice software options available, selecting the right one becomes crucial. Now let’s explore some key features you should prioritize when making your choice.
Here’s a breakdown of essential features to consider:
- Seamless Proforma Invoice Creation: This is the core functionality. The software should allow you to effortlessly create professional-looking proforma invoices with all the necessary details. Look for features like pre-designed templates, easy itemization of goods or services, and a clear breakdown of costs.
- Automation: The software automates invoice tasks, including numbering, tax calculations, streamline the process of creating and sending invoices to clients, freeing up time for business focus. It also handles overdue payments and generates GST invoices for enhanced efficiency.
- Customization: Flexibility is important. The software should allow you to customize invoices with your company logo, branding elements, and payment terms. This ensures your invoices reflect your brand identity and professionalism.
- Integration with Existing Systems: Consider how the software integrates with your existing accounting or CRM software. Seamless integration streamlines your workflow and avoids the need for manual data entry across different platforms.
- Security: Since invoices often contain sensitive information, data security is paramount. Choose software that offers robust security features to protect your client’s data.
By prioritizing these key features, you can select proforma invoice software that streamlines your invoicing process, saves you time, and projects a professional image to your clients.
Now let’s explore Refrens that facilitate seamless proforma invoice creation and delve into a step-by-step guide on how to create one effectively.
How To Create a Proforma Invoice Using Refrens?
Refrens stands out as a trusted solution for over 150,000 businesses worldwide, providing an integrated business management software. From sales optimization to meticulous financial tracking and tax management, Refrens streamlines essential operations into one cohesive system.
Furthermore, Refrens elevates professional standards by offering the seamless creation of proforma invoices. This functionality empowers businesses to generate detailed estimates efficiently, projecting a polished image to their clientele.
Steps to Create Proforma Invoice on Refrens?
1. Start a New Invoice:
– Access your Proforma Invoice Dashboard.
– In the sidebar, select “Create New Proforma.”
2. Add Basic Information:
– Title: Use “Proforma Invoice”
– Subtitle: Include your company name, address, or your company tagline.and other relevant information.
– The system will automatically generate an invoice number and date based on your previous invoices.
3. Customize Invoice Details (Optional):
– Due Date: Set the expected payment date.
– Business Logo: Upload your company logo for a professional touch.
– Additional Fields: Add custom fields like client IDs for better organization.
4. Select Client:
– Choose “Billed To”:
– Select an existing client from your list.
– Or Aadd a new client by entering their details.
5. Add Shipping Information (Optional):
– Include the shipping address if applicable.
6. Configure Tax (Optional):
– For tax invoices, navigate to “Configure GST” and choose the appropriate tax type.
7. Set Currency:
– Select the currency used for the transaction in the “Currency” tab.
– You can customize number formats and decimals under “Number/Currency Format.”
8. Manage Item Details:
– Rename or add columns under “Rename/Add Field Section” to match your product or service categories.
9. Add Items:
– Include each service or product in the list.
– Provide detailed descriptions if necessary.
– Attach images or thumbnails (if applicable).
– Use “Duplicate” to copy similar items for faster input.
– Organize services into groups with “Add New Group.”
10. Apply Discounts and Charges:
– Discounts can be applied to individual items or the total invoice amount.
– Include additional charges as needed.
11. Add Terms and Conditions:
– Edit existing terms or create new ones for your invoice.
12. Include Additional Information:
– Add notes, attachments, and other relevant details for your client.
13. Sign the Invoice:
– Upload your signature or create one directly on the invoice using the signature pad.
14. Set Up Recurring Invoices (Optional):
– If this is a recurring project, set the desired frequency for automatic invoice generation.
15. Provide Payment Information:
– Include your bank details and UPI for easy payments.
16. Easy Sharing and Payment Reminder
Effortlessly share your invoice via email, WhatsApp, or link, and easily schedule invoice reminders for timely payments.
Following these steps, you can create clear, professional proforma invoices that streamline your business processes and client communication.
When it comes to making proforma invoices (which are like preliminary invoices), Refrens is the go-to choice for several good reasons. First off, it’s super easy to use, especially for busy entrepreneurs in India. You don’t need to be a financial expert to create invoices or manage your money with Refrens – it’s designed to be hassle-free.
But Refrens isn’t just about making invoices. As comprehensive invoice management software, it offers a whole package deal, including keeping track of your expenses, generating reports, and managing your stock, all in one place. This saves you from having to use lots of different apps, making your work smoother and saving you time and money.4o
Refrens has loads of useful features like financial analysis to help you understand your money better, a top inventory management software to keep track of your expense and cashflow, and even delivery notes to keep track of your shipments.
It also has specialized tools like GST Billing Software to handle your tax needs, Multi-Business Management for those running more than one business, E-Invoicing Software for electronic invoicing, Bookkeeping Software to keep your accounts in order, Accounting Software to manage your finances, e-way bill software for transportation, Quotation Software for creating estimates, Lead Management Software to keep track of potential customers, Sales CRM Software for managing customer relationships, and much more. This means Refrens can cater to diverse business needs seamlessly.
Refrens simplifies dealing with taxes, especially GST, by assisting you in generating GST invoices, producing reports, and facilitating the filing of GST returns, effectively lightening your tax-related burdens. Additionally, it provides support for managing overdue payments, ensuring smooth financial operations.
And the best part? There’s a free plan available, and if you need more features, there are affordable options too. So, whether you’re running a small business or a big one, Refrens is the top choice for making invoicing and managing finances easy and stress-free in India.
Conclusion
In summary, creating a proforma invoice is straightforward and essential for establishing clarity in business transactions. Whether using Excel, Word, or dedicated invoicing software like Refrens, the process involves outlining key details such as product descriptions, pricing, and payment terms. Each method offers its advantages, from flexibility and customization in Excel to pre-designed templates in Word and automation in software like Refrens. By following the provided step-by-step guides on invoicing basics, businesses can effortlessly generate professional-looking proforma invoices, fostering trust and transparency with clients.
Related Posts:
 A Complete Guide to the Types of Invoices
 How To Create An Invoice?
 Export Invoice: A Complete Guide for Seamless Trade
 E-Invoicing Around the World: A Global Overview
 Top Electronic Invoicing Software In India
 Best Invoicing and Billing Software In India (Updated 2025 List)
 Zatca Compliant E-Invoices: A Detailed Guide for Businesses in Saudi Arabia
 Top 11 Invoicing Software For Contractors (Updated 2024 List)
 Top 7 Invoice Generator Software (Updated 2024 List)
 Best 10 Invoice Reminder Software (Updated 2025 List)
 Everything You Need to Know About Payment Receipts
 Top 10 Inventory Invoice Software
 List of Top E-Invoicing Software To Create E-Invoices Seamlessly (Updated 2025 List)
 The Ultimate Guide to the Best Invoicing and Client Management Software (Updated 2025 List)
 Best Accounting Software in India: Features, Pricing, Reviews, and more (Updated 2024 List)
 How To Create a GST Invoice In Shopify?
 Invoicing Basics: Everything You Need To Know
 Best Sales Purchase Invoice Software: A Detailed Guide