
In today’s digital age, Facebook Ads Manager has become a pivotal tool for businesses aiming to Capture leads and convert them into customers. This guide provides a detailed walkthrough on various aspects of leveraging Facebook Ads Manager, from downloading leads and creating lead generation ads to editing lead forms and integrating with other systems.
How to download leads from Facebook Ads Manager?
The data regarding leads submitted through your instant form can be downloaded as a CSV file from Meta Ads Manager. Alternatively, you can obtain these leads from Meta Business Suite, integrate Facebook with your CRM system via the Facebook API.
Instructions to download your leads data from Ads Manager:
- Navigate to Ads Manager.
- Click on the Ads tab.
- Choose the instant form from which you wish to download the lead data.
- In the Results column, click On-Facebook Leads. If a link isn’t visible in the Results column, ensure you are in the Ads tab, not the Campaign or Ad Set tabs.
- A window titled Download leads will appear. Click the This month dropdown menu to specify the date range for the lead data you wish to download.
- After selecting the date range, click Download.
- A new Download leads window will emerge, displaying the ad name, the number of leads, and the download links. Click either CSV or XLS to download the lead data in the file format of your preference.
Note: Lead information is retained on Meta for 90 days, hence older leads cannot be downloaded. It is advisable to download your leads regularly.
How to create an ad to generate leads in Facebook Ad Manager?
Lead ads serve as a bridge between you and prospective customers on Facebook and Instagram, collecting their details for further communication. Initiate lead ads through your Facebook Page, Meta Business Suite, or Meta Ads Manager.
Here’s an easy-to-follow guide on crafting lead ads using Ads Manager:
Before you start:
- Have your legal team go over the campaign queries, Lead Ads Terms, and Advertising Standards.
- Make sure a Privacy Policy URL for your organization is at hand.
Steps to create a lead ad with Ads Manager:
- Access Ads Manager.
- Click + Create.
- Opt for Leads as your campaign objective, then hit Continue.
- Input necessary details including campaign specifics, A/B test, and budget if required, then press Next.
- Within the Conversion section, choose your lead generation spot. Your options include:
- Website: Promote web conversions. Ensure a Meta pixel is installed beforehand.
- Instant forms: Invite individuals to complete a form on Facebook and Instagram.
- Messenger: Guide individuals to an automated Q&A flow in Messenger.
- Instagram: Direct individuals to an automated Q&A flow in a message.
- Call ads: Motivate individuals to phone your business for orders, inquiries, or appointments.
- App: Urge individuals to make in-app purchases. Register your app on Facebook and choose your mobile app store before starting.
- Navigate to a Performance goal, use the drop-down menu to pick a performance goal for your ad, then hit Next.
- Maximize lead count: Display your ads to those most likely to share their contact details.
- Maximize conversion leads: Display your ads to those most likely to convert after sharing their contact info. Though not mandatory, integrating your CRM beforehand is suggested to attain higher-quality leads.
- Move to the Facebook Page and select the Page representing the lead ad.
- Note: If it’s your maiden lead ad on this Page, click View terms, review the Lead Ad Terms, and choose I agree to Terms and Conditions.
- Fill out the Budget, schedule, Audience, and Placements sections.
- Note: Targeting capabilities are restricted for audiences including individuals under 18 in many nations.
- Under Identity, pick your Page and Instagram account if needed. Hit Connect account to link a new Instagram account.
- In the ad setup segment, opt for either a Single image, Video, or Carousel.
- In the ad creative portion, include Media, Headline, Description, and Call to action to your ad.
- Under Destination, decide where to direct individuals post-click. Your campaign destination choices, like your website or an instant form, hinge on the conversion location chosen in step 5.
- Head to Tracking and click Set up to establish CRM events, Website events, and App events to monitor event datasets if necessary.
- Click Publish to launch your lead ad.
How can you edit the lead form in Facebook Ad Manager?
Once published, editing an existing Instant Form for use in your lead ads is not permissible, however, modifications can be made while it’s still in draft status. To amend a published Instant Form, clone the form you desire to modify, enact the changes, and then publish it.
Modifying an Instant Form draft:
For an Instant Form to be altered, it needs to be in draft mode.
- Initiate the creation of an Instant Form for your lead ad.
- At the Ad level, navigate to the Instant Form section where a compilation of all current forms will be visible.
- Hover over the form intended for editing.
- Hit the Edit button. Bear in mind, to edit an existing form, it has to be saved as a draft. Without a draft status, the edit option will not be visible.
- Execute the necessary modifications and click either Save Draft or Publish. Selecting Save Draft retains a modified draft, whereas Publish will release the form. If modifications are incomplete, opt for Save Draft to revisit later.
Modifying a published Instant Form:
Published Instant Forms are resistant to changes. To amend, replicate the existing form, enact the alterations, and save as a new form.
- Kickstart the creation of an Instant Form for your lead ad.
- At the Ad level, traverse to the Instant Form section where a display of all current forms will be available.
- Hover over the form you aim to clone.
- Click the Duplicate button.
- Assign a refreshed name to your form and execute the necessary modifications.
- Hit Publish to release the form.
- This newly molded form is now accessible for use in any new or ongoing campaigns.
How to implement Facebook lead pixel with Google Tag Manager?
Sure! Here’s a refined version for better readability:
Integrate Meta Pixel with Google Tag Manager:
- Access Google Tag Manager: Log in and select your site’s container.
- Create New Tag: Click ‘Create new tag’ → ‘Custom HTML tag’, and label it.
- Get Meta Pixel Code: Navigate to Meta Events Manager → ‘Add event’ → ‘From a new website’ → ‘Install code manually’ → ‘Copy code’.
- Paste Code: Return to Google Tag Manager, and paste the code in the HTML section.
- Set Firing Options: Select ‘Once per page’ under ‘Advanced settings’.
- Activate Tag: Choose ‘All Pages’ under ‘Fire On’, then ‘Create tag’.
Craft Event-Specific Tags:
- New Tag: In Google Tag Manager, create a new tag, and name it.
- Insert Event Code: Add the respective event code snippet and any additional variables.
- Advanced Settings: Select ‘Once per event’ for tag firing, and ensure correct tag sequencing.
- Activate and Repeat: Click ‘Create tag’, and repeat for other events.
- Publish: Once done, hit ‘Publish’.
How to track Facebook lead generation with Google Tag Manager?
Tracking Facebook lead generation events with Google Tag Manager (GTM) involves setting up tags, triggers, and variables to capture the necessary data when a user interacts with your lead generation form or ad on Facebook. Here’s a step-by-step guide on how to do it:
Prerequisites:
- A Facebook Ads account with a lead generation campaign.
- A Google Tag Manager account and container set up for your website.
Step 1: Create a Facebook Pixel:
- Log in to your Facebook Ads Manager.
- Go to Events Manager.
- Click on your Pixel or create a new one.
- Set up the required events for lead generation, such as “Lead” or “CompleteRegistration.”
- Generate the Pixel code.
Step 2: Install Facebook Pixel in GTM:
- In your GTM container, create a new Tag.
- Choose “Tag Configuration” and select “Facebook Pixel.”
- Paste the Facebook Pixel code you generated in the previous step.
- Set the trigger for when the Pixel should fire (e.g., when a form submission or lead event occurs).
Step 3: Create a Trigger:
- In GTM, go to “Triggers” and create a new trigger.
- Choose the trigger type that corresponds to the event you want to track (e.g., form submission).
- Configure the trigger conditions, such as the form ID or URL where the lead event occurs.
Step 4: Create a Tag:
- In GTM, create a new Tag.
- Choose “Tag Configuration” and select “Custom HTML.”
- Paste the Facebook lead event tracking code provided by Facebook for the specific event you want to track. This code is typically found in your Facebook Pixel settings.
- Set the trigger to the one you created earlier for the lead event.
Step 5: Publish Changes:
- Once you’ve configured the Tag and Trigger, save your changes in GTM.
- Click the “Submit” button to publish the changes to your website.
Step 6: Test Your Setup:
- After publishing, it’s essential to test whether the tracking is working correctly.
- Go to your website, complete a lead generation action (e.g., submit a form), and check if the Facebook Pixel events are firing in the Facebook Pixel Helper or Events Manager.
Step 7: Monitor and Analyze:
- Give it some time to collect data.
- In Facebook Ads Manager, you can view the results of your lead generation campaigns and track conversions attributed to your Facebook ads.
By following these steps, you’ll be able to track Facebook lead generation events using Google Tag Manager, allowing you to measure the effectiveness of your Facebook ad campaigns in generating leads on your website. while also enhancing your marketing strategy with an AI ad generator to create engaging ad creatives.
How to give someone access to leads from the Business Manager on Facebook?
To grant access permissions for leads to individuals:
- Access Meta Business Suite.
- If you lack access to Meta Business Suite, navigate to Business Settings and choose your business. Then, proceed to step 5.
- Click on the dropdown menu located in the top-left corner and select your business account.
- Navigate to Settings, which is situated in the lower-left corner.
- Click on “More business settings.”
- Within the left menu, select “Integrations” and then “Leads access.”
- Click “Assign people.” A list of individuals with assigned roles on your Facebook Page will appear.
- Select the individuals you wish to grant access to by ticking the corresponding circles, and then click “Assign.” These selected individuals will now have access to your lead information.
- If you cannot find the name or ID of the person you seek, ensure they have a role assigned to your Facebook Page. Access to your lead data is contingent on having a Page role assigned.
To assign leads access permissions to partner businesses:
- Access Meta Business Suite.
- If you lack access to Meta Business Suite, navigate to Business Settings and choose your business. Then, proceed to step 5.
- Click on the dropdown menu located in the top-left corner and select your business account.
- Navigate to Settings, which is situated in the lower-left corner.
- Click on “More business settings.”
- Within the left menu, select “Integrations” and then “Leads access.”
- Click “Assign partners.” You will see a list of partners connected to your Facebook Page.
- Select the partners you wish to grant access to by checking the corresponding boxes, and then click “Assign.” These selected partners will now have access to your lead information.
- If you cannot find the name or ID of the partner you are looking for, ensure they have the Page admin role assigned to your Facebook Page. Partners cannot access your lead data without this role.
To better manage your page and understand who has access, learning how to see admins on Facebook Page is essential. This knowledge ensures that you’re aware of who can make changes or manage the page’s settings.
Please note that only the business that owns the Facebook Page has the authority to assign leads access permissions to partner businesses or agencies. Additionally, it’s important to recognize that assigning lead access to a partner also grants that partner the ability to assign lead access to their employees. A shared Page will not appear in the Partner’s Leads Access Manager until the following conditions are met:
- The partner is assigned a Page admin role.
- The partner is assigned permission in Leads Access Manager.
How can you pull leads from Facebook Ads Manager into a PHP system?
To pull leads from Facebook Ads Manager into a PHP system, you can use the Facebook Marketing API. Here are the steps to achieve this:
Prerequisites:
- Facebook App: You need to create a Facebook App in the Facebook Developers portal. This app will allow you to authenticate and interact with the Facebook Marketing API.
- Access to Facebook Business Manager: You must have access to the Facebook Business Manager account associated with the Facebook Ads from which you want to pull leads.
Step-by-Step Guide:
1. Set Up Your Facebook App:
Create a new Facebook App if you haven’t already, and note down the App ID and App Secret.
2. Obtain Access Token:
Use the App ID and App Secret to obtain a long-lived User Access Token by following the Facebook authentication process. You can do this manually or use Facebook’s Graph API Explorer.
3. Generate a User Token:
You’ll need to generate a User Token with the ‘ads_read’ and ‘leads_retrieval’ permissions for the user who has access to the Facebook Ads Manager.
4. Set Up the Facebook PHP SDK:
Download and include the Facebook PHP SDK in your PHP project.
5. Authenticate with Facebook:
Use the generated User Token to authenticate your PHP application with Facebook’s Marketing API. This involves initializing the SDK with your credentials.
6. Retrieve Leads:
Use the Marketing API to query for leads from your Facebook Ads campaigns. You can use the `/adleads` endpoint to retrieve lead data associated with specific ads or forms.
Here’s an example code snippet to retrieve leads using the Facebook PHP SDK:
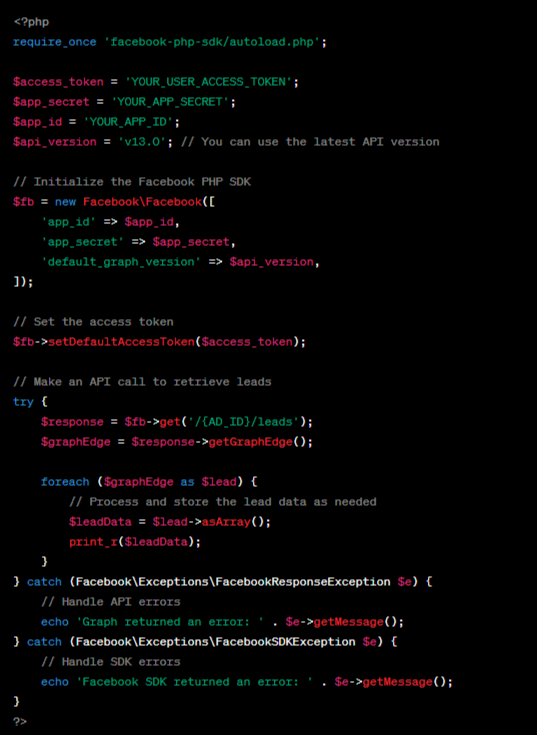
Make sure to replace `’YOUR_USER_ACCESS_TOKEN’`, `’YOUR_APP_SECRET’`, `’YOUR_APP_ID’`, and `'{AD_ID}’` with your actual credentials and the specific ad ID from which you want to retrieve leads.
Please note that Facebook’s API usage may require app review and approval by Facebook, and it’s subject to their terms and policies. Additionally, Facebook’s API and authentication methods may change over time, so it’s essential to refer to the Facebook Developers documentation for the most up-to-date information and guidelines.
Conclusion
Effectively managing and utilizing leads from Facebook Ads Manager can significantly enhance a business’s digital marketing efforts. By understanding how to download, create, edit, and integrate leads, businesses can streamline their lead generation process, ensuring that potential customers are not only reached but also engaged in a meaningful manner.
As with any tool, the key lies in understanding its features and capabilities, and this guide aims to equip businesses with the knowledge to do just that. Whether you’re a novice or a seasoned marketer, mastering the intricacies of Facebook Ads Manager can pave the way for successful lead generation and conversion campaigns.
Related Posts:
 Integrating Facebook With A CRM: The Complete Guide
 The Ultimate List of 40 Best Lead Generation Tools to Supercharge Your Business
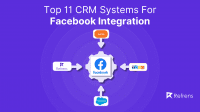 Top 11 CRM Systems For Facebook Integration (Updated 2025 List)
 How To Integrate IndiaMART With A CRM?
 Creating A Stellar Business Profile: A Step-by-step Guide
 GSTR 7A: Eligibility, Downloading Process, Deadline, Mistakes to Avoid, and FAQS
 Top 10 CRM Software You Can Integrate With Indiamart
 Exploring The Best Typeform Alternatives: Our Top 15 Picks
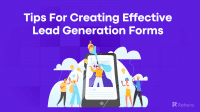 11 Tips For Creating Effective Lead Generation Forms
 How to Manage Real Estate Leads: An In-Depth Guide
 12 Best Ways to Generate More B2B Sales Leads
 Your Complete Guide to GSTR 3B: Filing Process, Due Dates, Penalties, and FAQs
 Data Capture Forms: Your One-Stop Guide
 Everything to know about GSTR 9C: Eligibility, Filing Process, Amendments, and FAQS
 Top Lead Management Software for Small Businesses
 How to Master In B2B Lead Generation with Effective Strategies?
 Your Complete Guide to GSTR 4: Due Dates, Formats, Filing Process, Penalities, and FAQs.
 GSTR 2: Everything You Need To Know